Follow our checklist, review console feedback, and perform manual checks to ensure your integration is correct, functional, and up to standard.
Context
As a Fittingbox client, you manage your VTO integration independently and are responsible for validating it before launch.
We’ve seen recurring issues—often already covered in the developer documentation—that go unnoticed by non-technical reviewers. In many cases, developers are no longer available to make updates after deployment.
This solution helps non-developers verify their VTO integration early and ensure optimal quality before going live.
Value
-
Higher-quality initial integrations: Fewer bugs, better performance, improved end-user experience.
-
Avoid recurring and preventable issues with your integration.
-
Faster go-to-market: Identify and solve problems without waiting on developer availability.
QA Checklist
Here’s how to run the VTO integration check on your website and get pertinent feedbacks :
1. Open a product page with VTO enabled
Go to any product page where the Virtual Try On button is visible.
2. Open the browser console
-
On Windows: Press
CTRL + Shift + I -
On Mac: Press
Option + ⌘ + J -
Or: Right-click > Inspect > Console tab
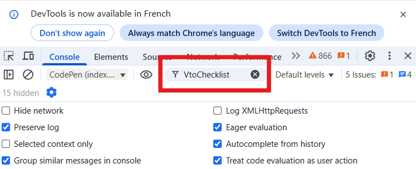
3. Filter for integration messages
In the console search bar, type:VtoChecklist
This will help you view only relevant debug feedbacks from the VTO integration.
4. Interact with VTO
-
Click on the “Virtual Try-On” CTA
-
Complete a try-on session
-
If there's a frame carousel, select a different frame
-
Close VTO
5. Verify camera shutdown
After closing the VTO :
-
On laptops, check that the webcam light turns off : this confirms the camera has been properly deactivated
6. Start a second session
-
Click the “Try-On” CTA again
-
Close the VTO again
7. Review console output
- If you only see the following feedback, it means that your integration is completed and correct :
VtoChecklist - VTO is up to date-png.png?width=424&height=216&name=image%207%20(1)-png.png)
-
If you have another or several other feedbacks
→ There are issues in your integration. See explanations below and share these with your development team.
Console feedbacks & their meanings

Here are the messages you might see, what they mean, and how to fix them :
VTO is instanciated multiple times
-
Issue: VTO is initialized again on every CTA click
-
Impact: Leads to performance issues and delays
-
Fix: Only instantiate VTO once. See our documentation
startVto is triggered multiple times
-
Issue:
startVto()is called multiple times per session -
Fix: Call
startVto()only once, at session start. See our documentation
onStopVto is missing
-
Issue: The session is ended using
stopVto()directly without triggeringonStopVto -
Impact: The camera may remain active even after the VTO is closed
-
Fix: Always use
onStopVtobefore callingstopVto(). See our documentation
Methods are being called before VTO instantiation
-
Issue: You're calling VTO methods before the VTO instance is created
-
Fix: Instantiate VTO first, then call any methods. See our documentation
VtoChecklist - Method not defined
-
Issue: You’re using a method not recognized by the VTO
-
Fix: Double-check the method name in our documentation
VtoChecklist - Integration options error
-
Issue: You're using an invalid option in your integration configuration
-
Fix: Check option names and values in the documentation
VtoChecklist - Frame id "XXX" doesn’t exist in VTO database
-
Issue: You requested a frame id that doesn't exist in our database
-
Fix: Look for typing errors or check frame availability
Using this checklist, you can independently validate the technical correctness of your VTO integration—without requiring a developer. This process helps reduce bugs, avoids end-user frustration, and ensures your site is ready to deliver an optimal try-on experience.
For any remaining questions or if you encounter issues, please contact our support team.